REPU REPU

preview::
- Spoiler:
Step 1
Begin by opening the photo of the of the model into Photoshop. Because we are giving this image a dark feeling, we’ll use the levels tool to reduce the brightness and increase contrast. Choose Image > Adjustments > Levels and adjust the settings like shown in the image below.
- Spoiler:
Step 2
While increasing the contrast, we also increased the saturation. Choose Image > Adjustments > Hue/Saturation to reduce the saturation.
- Spoiler:
Step 3
Choose Image > Adjustments > Color Balance. With the color balance tool, we’ll reduce the reds and yellows in the image and add a bit of green. Adjust the settings like shown in the image below. This will give it a strange color effect that is slightly similar to the color effect of lomography. This is just a simple first edit on our image and later we’ll add different color and lighting effects.
- Spoiler:
Step 4
Now let’s play now with the powerful liquify filter. Choose Filter > Liquify. In the Liquify window, you’ll find the tools on the left and the settings on the right side.
In the center of the window is the workspace and preview. Working with the liquify tool is like working with clay. Imagine that you are creating a clay figure that you can smudge and distort it in the way that you want. This is how it works, more or less.
I recommend you that you play with this filter some minutes before to start to work. It’s easy to use but you need practice to get realistic results.
Press B to select the bloat tool. The bloat tool will expand the area that you paint. It’s important that use it carefully by clicking little by little in slightly different areas rather than holding the mouse button on one area.
Now select a brush size about 260 and brush over one of the eyes. Use it carefully in the center of it and make it bigger. Do the same for the other eye.
Press W to select the forward warp tool. It’s like a finger that push pixels. This tool is really useful and can help get better results after using the bloat tool. Use it to fix some types of distortions. For example, if the pupil is not a perfect circle after using the bloat tool, you can use the forward warp tool to correct the imperfections to make it a perfect circle.
Keep the liquify window opened.
- Spoiler:
Step 5
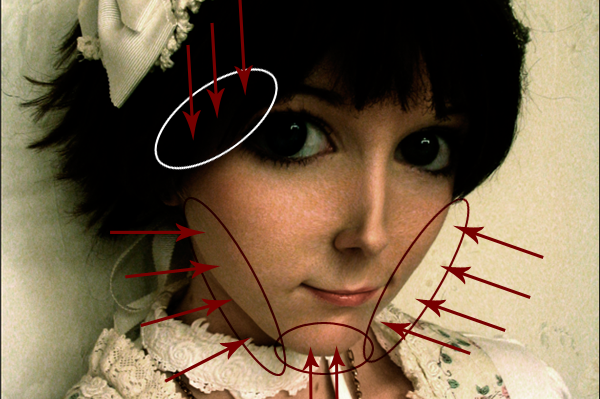
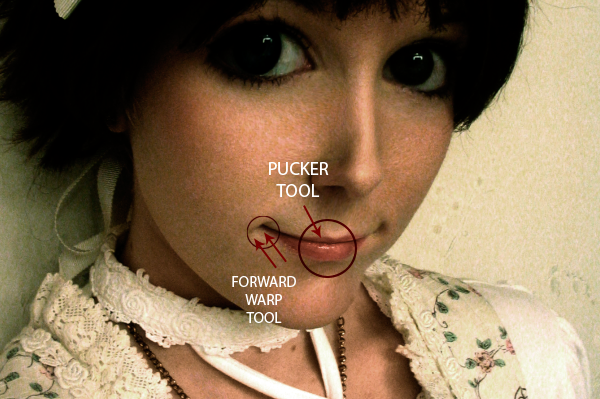
Now let’s work on the nose. Press S to select the pucker tool. The pucker tool is the opposite to the bloat tool. The technique we’ll be using with the pucker tool is the same that the previous one but using a smaller brush size (about 190). Use it on the tip of the nose to make it smaller. Switch to the forward warp tool (w) and, using a smaller brush (about 120), push the sides of the nose towards the centre to get a smaller and thinner nose.
- Spoiler:
Step 6
Next step is to use the liquify filter over the mouth of the girl. Select the Pucker Tool (S) with a brush size about 280 and press in the center of her lips. Be subtle, we don’t want to erase her mouth. Then use the Forward Warp Tool to correct and line up correctly her smile, you can make her smile bigger if you press over the corner of her mouth and drag it carefully.
- Spoiler:
Step 7
Because we have done so many modifications to the eyes and nose, her face still looks a little too big. We are going to correct this with the forward warp tool. Select the forward warp tool and push the edge of the face and chin to make her face look slimmer. Use a brush size about 190 for the large areas and a smaller one for the smaller details.
I modify other places like the hair, pushing down it a little and then I retouch the nose, mouth and eyes. Feel free to modify everything to get the best surreal portrait as possible.
Ensure that you don’t distort the areas that you don’t want. This usually happens when you’re using a big brush. In these cases it’s useful to use a mask. Select the freeze mask tool (F) then paint the zones that you don’t want to modify (for example the neck of the model). Once you have painted the mask, you can feel free to edit without worrying about modifying the areas that you don’t want to.
- Spoiler:
Step 8
Click OK to close the liquify tool then select the burn tool. We are going to darken some of the shadows on the face. Change the brush size to about 257 px and the exposure about 25 %
[spoiler]

Use the burn tool to darken some areas on the hair and nose.
- Spoiler:
Step 9
Now with the same tool and a brush about 60 px and 50% exposure, shape the edge of the eye to make it darker. Try not to leave it too much from the eye line. Then, with a bigger brush add more shadows over the eyes to make it even darker.
- Spoiler:
Step 10
Select now the blur tool (R) with a brush about 60 px and a strength around 71%. Paint over the face and neck to make the skin smoother.
- Spoiler:
Step 11
Now select the healing brush tool and correct the imperfections on the skin. Be sure that you erase the smudged texture created from the Liquify filter (in my sample they’re visible next to the nose).
- Spoiler:
Step 12
Now we’re going to paint the models lips to make it more striking. Create a new layer on the top and select the brush tool (B). Use a small brush (about 30) and select a dark red color. On the newly created layer, paint over the lips with the selected red color. You don’t have to be too careful because we are going to fix this later.
Change the layer mode to Soft Light and the opacity to 62%. Finally use the eraser tool to erase any painted areas that are not on the lips.
- Spoiler:
Step 13
Now select the smudge tool (R) with a small brush (about 8 px) and strength at 80 %. We are going to add some hair. in quick downward motions, smudge on the areas shown in the image below to create the hair. Alternate the size of the brush to get shorter or longer hair. You can quickly change the brush size by pressing the [ and ] keys on your keyboard.
After you created the hair, you’ll notice that the background has been blurred from the smudge tool. We’ll fix this later.
- Spoiler:
credits to ::
photoshoptutorials.ws


 .
.